Looking for fun ways to keep your kids entertained and learning this spring, without screens? You’re not alone! Finding activities that are both engaging and educational can be a challenge. That’s why we’ve put together these exciting, hands-on craft ideas that will spark creativity, encourage problem-solving, and provide hours of fun. Whether your child loves painting, cutting, gluing, or exploring the wonders of space, these screen-free activities are perfect for keeping little hands and minds busy!
Why Crafting is Great for Kids
Crafting isn’t just fun, it helps develop essential skills! It strengthens fine motor abilities, encourages problem-solving, and nurtures creativity. Plus, it’s a wonderful way for families to bond, work together, and create something special while making lasting memories.
Crafting Safety Tips
Before you begin, here are some important safety reminders:
- Always use child-safe, non-toxic materials.
- Supervise children when using scissors, glue, or small items.
- If using sharp tools (e.g., push pins for the constellation craft), ensure an adult helps or provides guidance.
- Cover surfaces with newspaper or a craft mat to prevent messes.
- Encourage kids to clean up afterwards, crafting is fun, but tidying up is part of the process!
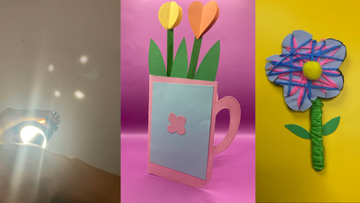
1. Flower String Art
Celebrate the beauty of spring with this vibrant flower craft that’s both colourful and interactive!

Materials Needed:
- Cardstock
- Cardboard
- Wool
- Glue stick
- Craft sticks
- Scissors
Instructions:


- Create the Flower Base. Draw and cut out a flower shape from the cardstock. Stick the cardstock flower onto the cardboard to make it sturdy.
- Prepare for String Art. Cut small slits around the edge of the flower shape to slot the wool into.
- Wrap the Wool. Tape one end of the wool to the back of the flower. Wrap it around the shape, slotting it into the slits. Try layering a second colour on top for a cool effect!
- Make the Stem & Leaves. Wrap a green craft stick with green wool and tape the ends securely. Cut out leaf shapes from green cardstock and attach them.
- Assemble the Flower. Stick the stem to the back of the flower using glue dots or tape. Add a yellow woolly pom-pom in the centre to complete your masterpiece.
- Repeat for More Flowers! Create a whole bouquet to decorate your home!
2. Mug Flower Card for Mother’s Day
Mother’s Day is just around the corner, so why not make a handmade card that Mom will treasure forever? This creative activity for children is simple, cute, and full of love.

Materials Needed:
- A4 cardstock (for the mug)
- Coloured paper (for flowers & leaves)
- Scissors
- Glue stick or double-sided tape
- Green craft sticks
- Flower templates (tulip, heart, circle)
- Pencil for tracing
Instructions:


- Create the Mug Card Base. Fold A4 cardstock in half and cut out a mug shape, ensuring the straight side stays on the fold so the card opens.
- Cut Out the Flower Window. Use a flower template to draw and cut out a flower shape in the centre of the inner mug piece. Stick the inner mug piece to the outer mug using double-sided tape.
- Make the 3D Tulip Flower. Cut out three teardrop shapes for the tulip. Fold two in half and glue them onto the third, creating a 3D effect. Secure a craft stick between the tulip and a matching back piece.
- Make the 3D Heart & Circle Flowers. Repeat the 3D folding method with heart and circle shapes, attaching them to craft sticks.
- Assemble the Card. Stick your flowers inside the mug card, add leaves.
- Final Touches. Personalize your card with “Happy Mother’s Day, love from [Your Name]” and decorate with stickers or glitter!
Handmade gifts are extra special because they show time, effort, and love! Who will you be making your card for?
3. Constellation Projector
Turn your room into a starry night sky with this hands-on learning kit for kids that teaches them about constellations in a super fun way!

Materials Needed:
- Aluminium foil
- Tissue roll (toilet paper or paper towel roll)
- Black marker
- Scissors
- Rubber band or tape
- Push pin or sharp pencil
- Flashlight
Instructions:


- Prepare the Foil. Cut a small square of aluminium foil, big enough to cover one end of the tissue roll.
- Create Your Constellation. Use a push pin or sharp pencil to poke small holes in the foil in the shape of a constellation.
- Attach the Foil. Secure the foil over one end of the tissue roll with a rubber band or tape.
- Project the Stars! In a dark room, shine a flashlight through the open end of the roll while pointing the foil side at a wall or ceiling.
- Watch the Magic! Your constellation will appear in the dark, just like a real night sky. Try different constellation patterns for extra fun!
Did you know? Constellations are patterns of stars in the night sky that people have used for navigation and storytelling for centuries! Some famous ones include Orion, Ursa Major, the Big Dipper, and Cassiopeia. What’s your favourite constellation?
Let’s Get Crafting! 🎨
Crafting is a wonderful way to spark creativity, encourage hands-on learning, and spend quality time together as a family. These fun kids activities at home provide screen-free entertainment while helping children develop fine motor skills and problem-solving abilities. So gather your materials and get crafting, your next masterpiece awaits!
Want even more creative activities for children? Check out KJ’s Craft Time’s hands-on learning kits for kids for more exciting projects that bring imagination to life!
Happy Crafting! 😊✨


